My Blog

My blog has morphed over the years into different things. It is a place to learn about saving money, product reviews, cooking, gardening, and homesteading. It can take you to whatever has my attention at the moment and then back to the day to day. I hope you will learn something here and come back often.

Tuesday, July 17, 2012

Processing Tomatoes ~ Option 2

Sorry it has taken me a few days to get this post up.  I've been canning tomatoes!  I've also been working in the garden.  The garden was so happy to see the rain last week but the weeds were too!!  I couldn't believe how they took over in just a few days time!

In the last blog I showed you the traditional way of peeling tomatoes.  You know....the boil, dump in ice water, then peel and core.  Well, here is the EASY way to do it!

Core the tomatoes

Throw them in a food processor...skin and all
Process!


Then I cook it down just like in the previous post.

Once your tomatoes are at the consistency that you want them, it's time to can or freeze them.


To can them you will need a large pot, jars, 
and these handy gadgets if possible.
Funnel, jar lifter, lid magnet


I begin by filling my canning pot about 2/3 of the way full.  Turn the stove on high and let the water begin heating.  This will take a while because of the volume of water you are working with.  While the water is heating I wash my jars and lids then place them in the pot of water.  This way they heat up with the water.

In the meantime, make sure your tomato sauce is hot.  REMEMBER...always add HOT liquid to HOT jars. If you don't you could have a mess!

Use your funnel to keep the top of the jar clean. Add 1 T. lemon juice to each pint jar and 2 T. to each quart of tomatoes.  Fill the jar with tomato sauce leaving 1/2" headspace at the top.  Wipe the rim of the jar with a damp cloth.  Place lid on jar until just tight.  Do not overdo it!  Put you jar back in the water bath.  Repeat until you have enough jars to fill the pot.  Cover and boil for 35 minutes.  Once they are finished, remove from the water and place on a towel.  You will hear the pop of the tops as they begin to seal.  Let the jars rest for 24 hours and then store.  You may also want to write the contents and date on the lid.


Now, if you have read this far in my blog, I think you deserve a prize!  Please go check this out.  Let me know which video is your favorite and you will be entered to win a coupon for FREE Purex!  I'll let you know my favorite in the next blog.

Saturday, July 7, 2012

Journey to the End of the Tomatoes ~Preserving Tomatoes

The tomatoes are coming in!  What you can't see are all of the ones lining my kitchen island!  I started bringing them in so they can continue to ripen inside because as they ripen outside the birds start feasting on them.  Nothing aggravates me more than seeing peck marks in my beautiful ripe tomatoes!

So, now the works begins.  I'm going to give you a little description of how I prepare the tomatoes for canning.  Now, there are many ways to can tomatoes.  I would recommend have a Ball Blue Book in your kitchen at all times.  It's my favorite guide to all things canning! The Blue Book may have something similar to what I'm going to tell you about but I'm not sure.  I am going to tell you about the way I like to process my tomatoes.  I learned to do it this way through experimenting the last couple of years.  


Of course, we begin by washing everything off and removing any stems that remain.

Step 1:  Bring a large pot of water to a boil.  Place a few tomatoes in the water at a time.  I think "technically" you are supposed to leave them in for about 30 seconds.  I don't really time mine.  I just keep everything moving at a pretty good pace and it all seems to work out.  If the tomatoes split while in the water that's not a problem.


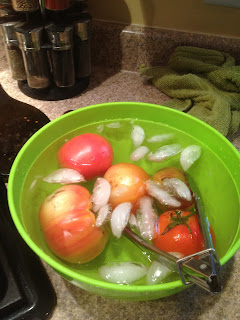
Step 2:  Place tomatoes in a pan of ice cold water to stop them from cooking.  You will have to replace the water and ice frequently as the tomatoes will heat it up in no time!


Step 3:  Peel tomatoes and core them.  The peels should just slide right off without much work on your part.  If the skin did not split on it's own while in the boiling water, I just take a sharp knife and slice lightly across the bottom of the tomato.  Slip the skins into your compost container and cut out the core and any bad spots that may be on your tomato.

Step 4:  Place all of your tomatoes in a large stock pot.  Do NOT add water!  Just fill it up until it's almost full and set your temperature to Med/High and let it cook.  This is NOT going to be a short process!  I wander through and stir the tomatoes whenever I think about it and adjust the temp up or down depending on how hard it is cooking.  You want it to just barely boil.  I cook it down until it is about 1/3 of it's original volume (usually 4-5 hours).  This cooks the water out so you are not canning 1/2 water and 1/2 tomatoes.
Ok, I had mine too full and had to add a 3rd pot
When the tomatoes get to the consistency that I like, I add diced onions, garlic, fresh basil, salt and pepper.  You can also add a dash of sugar to cut some of the acidity if you would like.  I let this cook for another 30 minutes or so.  Grab your handy dandy boat motor aka hand blender and blend to get an even consistency.  Now you are ready to can, freeze, or use your tomato sauce!
Front pot blended the back pot was not

I have an easier way of processing your fresh tomatoes.  I hope to have it ready for you in the next day or two and then we will go to How To Can.


Friday, June 29, 2012

The Zucchini Candy Experiment

I am very happy to announce that our home is overrun with fresh fruit and vegetables.  I am happy because this has been a GRAND year for the garden!  The last couple of years we have drowned in the spring thanks to excessive rain only to be dried out overnight by oppressive heat.  This year we have eased into summer with wonderful temperatures that have allowed the garden to flourish.

I have been looking for creative ways to use my mounds of zucchini that have been coming in.  I usually just saute' up the small ones with a little onion but every now and then we find one that has hidden from us and is as long as my arm.  After filling the freezer with zucchini pecan muffins I ran across a recipe for Zucchini Candy!    The reviews were great so I thought I would try it too.

I only had one package of Kool-Aid since I don't normally buy the stuff.  I made half of a recipe using the Sour Apple Kool-Aid and I made up my own spicy concoction for the other half.  I made a simple syrup and added cinnamon and Sriracha.  I didn't measure the ingredients.  I just added stuff until it tasted balanced.

The result...


It really is good.  I have to admit that my favorite is the cinnamon sriracha.  It has enough heat to get your attention but a great flavor.  The candy is very similar to gummy worms.


And being one that does not like for anything to go to waste, I strained the remaining Kool-Aid marinade, added water and served it to the boys as a nice, refreshing drink.  I took the remaining cinnamon sriracha marinade, strained it, and made jelly.  It will be wonderful served over cream cheese with some crackers! That's the jelly there in the middle ---->


One more fun thing I am doing now is making my own Kefir.  Some of our friends came through town last week and she gave me some Kefir grains.  If you don't know much about Kefir and it's health benefits I would encourage you to do a little research on it.  The boys and I have been having smoothies for breakfast every morning.  I blend together 1 frozen banana, fresh blackberry juice, a handful of blueberries and about 1 cup of Kefir.  It is delicious!

Wednesday, June 27, 2012

Dry Idea Report and GiveAway

The results are in!  I received a free bottle of Dry Idea Deodorant/Antiperspirant to try out and let you know what I think about it.

I will admit...in the beginning I thought "Dry Idea" was a bit of an oxymoron!  This deodorant goes on really wet.  This was a little weird to me at first because I've never used anything like this.

I will also admit...I didn't really expect it to work well.  :(

The good news....It worked great!  I tested Dry Idea while going about my daily routine.  I get up at 5:30 and head out to the garden.  I put in a couple of hours working out there and then come in and spend a couple of hours in the kitchen preserving my goodies.  After that, it's on to the daily household chores of cooking and cleaning.  By the end of the day, I have sweated in the Memphis heat and humidity, cooled off, and sweated again.  Dry Idea kept me dry and smelling good! :)

I have no complaints or concerns with this product and I can wholeheartedly give it my stamp of approval and offer it to my friends and readers.

If you would like to try Dry Idea for free send me an email at kfreekave@aol.com.  Put DRY IDEA in the subject line and you will be entered into the drawing.  The winner will receive a coupon so you can try it for yourself.


Winner will be notified on July 1, 2012.


Friday, June 15, 2012

Testing Day

In the last blog, I told you that I will be doing a give-away soon.  Well, it's getting closer.  I got my free sample in the mail today and I will be putting it to the test.  Wondering what it is? Well, go here and sign up for the $1,000 in prizes they are giving away.

While you do that...I'm going out to work in the garden and put this product to the test!  I can think of no greater way to test it than in the Memphis heat and humidity.

So, stay tuned.  I will be writing a review soon and offering you a coupon for a free, full size product for you to try to!


Tuesday, June 12, 2012

New Give-Away & Recipe

I will soon have a new giveaway for those of you that read my blog.

In the meantime, sign up for this: http://insiders.purex.com/dryidea?id_1706.

In case you haven't read in my past blogs.  I love Purex and I love being a Purex Insider.  It allows me to try new products and pass on coupons for FREE items so you can try them too.  The more people that read this blog and sign up for the sweepstakes the better our chances of continuing to receive free stuff.

To the Garden~ The veggies are starting to come in and the tomatoes are starting to turn.  It makes my mouth water just thinking about that first tomato sandwich! YUM!  Most of our meals now are centered around vegetables so I thought I would share this recipe with you.  It's one of my favorites right now.

Spicy Rice

1 c. chicken broth
1 c. brown rice
1.5 T. cajun seasoning
Your choice of veggies

Bring chicken broth and cajun seasoning to a boil.  Add rice.  Cover and reduce heat.  At this point, I add kale, squash and zucchini.  Cook 25-30 minutes until rice is done.  Option:  You can choose to add your veggies later if you like them crisp.

Friday, June 8, 2012

My Favorite Time of Year

Some people love it when the days begin to cool off and winter is in the air.  Others get spring fever when the flowers begin to bloom and the grass starts turning green. Me, I love it when the days heat up and the garden starts producing.

I love everything about gardening.  I like working the soil and getting it ready for planting.  I am thrilled when the first little bit of green breaks through the ground.  And then the ultimate...the day I get to start picking the fruits of all of my labor!  I am always awed by the miracle of life, even in plants.

Can't Wait For These To Ripen

Sea of Squash